ZainCash Integration Guide
This guide details how to integrate the ZainCash online payment service into your website.
Register a Wallet
To integrate your site application with ZainCash in order to start getting paid online, you first have to register a wallet, choosing from one of the three types of wallets available:
- Special Wallet: for small business and startups, with a maximum of 100 million transactions per month and no daily limit.
- Corporate Wallet: for large businesses, the maximum amount of transactions per month depends on the size of the company.
- Government Wallet: for government entities.
Your website has to be submitted first to ZainCash to make sure it does not violate any of ZainCash’s security guidelines.
After you finish registering a wallet, you’ll be sent an email with the following details:
- 1. Test Merchant Phone Number and Pin.
- 2. Test Customer Phone Number and Pin.
- 3. Private Key to generate JSON Web Tokens.
After you finish inserting and confirguring ZainCash’s checkout button on your website using a testing environment, you will be provided with the production credentials.
- Development URL: https://test.zaincash.iq/
- Production URL: https://api.zaincash.iq/
Generate a transaction ID
The first step is to issue a transaction ID that you’ll be using later on.
Based on the Private Key that was sent to you through email, generate a JWT token (https://jwt.io/) after filling the payload with the amount to be transferred, msisdn that represents the merchant phone number (it has the format 96478xxxxxxxx or 96479xxxxxxxx), serviceType that represents the type of service (like “AAA books website”), the orderId: a reference for the order primary key in your website, and the redirectUrl that represents the webpage the user is redirected to: it is either a page that displays an error message or a confirmation message for a successful transaction.
Integrate within the code of your website the capability of generating a transaction ID, using the the token generated and the Merchant ID provided to you by ZainCash.
The language to be used can also be specified within the code: in this case, we have English, Kurdish and Arabic to choose from.
For security considerations, the transaction ID generated will only be valid for one hour.
NodeJS Example
app.get('/PageAfterClickOnSubmitWithZainCash', function (req, res) {
jwt.sign({
amount: 1000,//Product Ammout
serviceType: 'AAA books website',
msisdn: 9647911111111,
orderId: 12345,//optional
redirectUrl: "http://www.yourwebiste.com/zain_order.php",//optional
}, 'secretsecretsecretsecretsecretsecretsecretsecretsecretsecretsecretsecretsecret', {
expiresIn: '4h'
}, function (err, token) {
request.post({
url: 'https://test.zaincash.iq/transaction/init',
form: {
token: token,
merchantId: "572487bca0a4d6f2688c1ee3",
lang: "ar"//optional
}
}, function (err, httpResponse, body) {
var body = JSON.parse(body); // response of body { id : "asdae123asd123asd" }
if (body.id)
return res.redirect('https://test.zaincash.iq/transaction/pay?id=' + body.id);
return res.redirect('/payment?msg=cannot_generate_token');
})
});
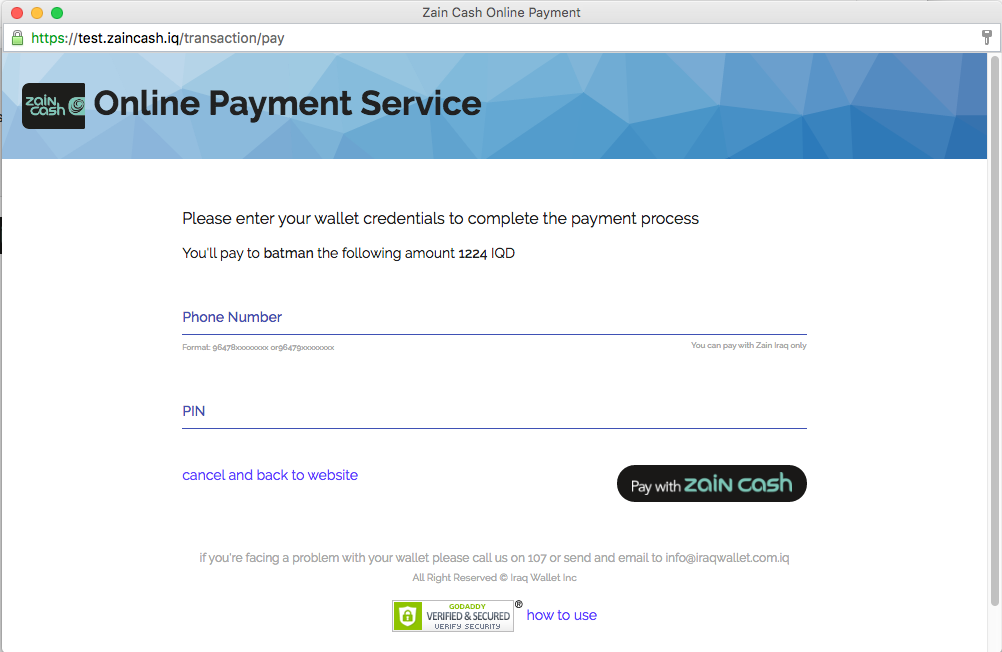
});Open the Pay Page
Insert the following lines of HTML code to add the “Pay with ZainCash” button:
<button class="zaincash-btn" >
  <img  style="vertical-align:middle" src="https://test.zaincash.iq/images/zaincash-ar.png">
</button>
Add the following CSS code for aesthetics:
.zaincash-btn {
    background: #191817; /* Old browsers */
    border-radius:30px;
    border: none;
    outline: none;
    padding-right: 15px;
    padding-left: 15px;
    padding-top: 7px;
    padding-bottom: 7px;
}

.zaincash-btn:hover{
    background: #333231;
    transition: all 0.2s;
    color: #fff;
    border-radius:30px;
    border: none;
    outline: none;
}

.zaincash-btn > img {
    width: 160px;
}
When a user clicks on the checkout button on your website, redirect the user to a page where the transaction ID will be issued.
To open the pay page as a pop-up, configure the URL of the same webpage to open in a separate window whenever the user clicks on the checkout button.
The user will be prompted to enter their credentials (phone number and PIN).
It’s up to you to post the data to a popup or an iframe inside a modal window.
Receive and Post the OTP
Upon phone number and PIN validation the user will receive an SMS containing a 4-digit OTP. This OTP should be inserted by the user within the portal, in order to continue the payment process.

Payment Completion
It you are sending a URL value to redirect, the success or the error of the operation will be detected within the code of the redirect URL parameter in the form of a JWT token. The signature of the token will have to be valid in order to get the value of the payload.

The EventListener method can be used when on the pay page popup, in order to know whether the transaction was a success or if an error occurred. The postmessage method can be used to inform whether or not an error occurred.
This can be implemented using the following lines of code:
window.addEventListener('message',function(event) {

  if(event.origin !== 'https://test.zaincash.iq') return;

  if (event.data.status == 'failure') {
    window.location.href = 'failed'
  } else if (event.data.status == 'success') {
    window.location.href = 'success'
  }
},false);
Check the status of the transaction
In order to check the status of the transaction, take the transaction ID and make sure it is associated with the correct ID. The transaction ID is provided to the user after the payment process is complete. The transaction ID will expire after 1 hour so the checking should be done within the hour.
Check Status API is similar to init API, this is where a token should be generated and inputted along with the merchant ID provided to you by Zain, along with the “secret”-based signature into the JWT.io site. Below is a NodeJS example on how to check the status of the transaction.
app.get('/get', function (req, res) {
    jwt.sign({
        id: '578c8d1cc4feda8b118e60e6',
        msisdn: 9647911111111,
    }, 'secretsecretsecretsecretsecretsecretsecretsecretsecretsecretsecretsecretsecret', {
        expiresIn: '4h'
    }, function (err, token) {
        request.post({
            url: 'https://test.zaincash.iq/transaction/get',
            form: {
                token: token,
                merchantId: "572487bca0a4d6f2688c1ee3"
            }
        }, function (err, httpResponse, body) {
            var transaction = JSON.parse(body);
            console.log(transaction);
            res.render('transaction', transaction);
        })
    });
});